Tuesday, November 30, 2010

Emily Mori - Patisserie in Japan

Have you heard of Emily Mori? If you live in the USA most likely not, but if you live in Japan, you will soon be able to eat her delicious treats as her Patisserie will open up in the next couple of months. I had the pleasure of eating some of her handmade treats recently and they are d-e-l-i-c-i-o-u-s. Very unconventional for american ways. The box they came in was impeccable, not just any paper box, and the packaging was perfect..just like the japanese ways.
My favorite was the sesame cookie. Quite a destinct flavor. It had a delightful crunch to it.
Emily studied pastry in Japan and spent some time in France perfecting her art. Although she  already takes online orders, she has us quite excited about the opening of her shop.

The delicious sesame seed cookie!

Here is some of her work

Saturday, November 27, 2010

Daring Baker's November Challenge: Crostata

The 2010 November Daring Bakers’ challenge was hosted by Simona of briciole. She chose to challenge Daring Bakers’ to make pasta frolla for a crostata. She used her own experience as a source, as well as information from Pellegrino Artusi’s Science in the Kitchen and the Art of Eating Well.

I decided to do a  raspberry-cassis pastry cream crostata.

Equipment required:
  • bowls, as needed
  • fork
  • knife
  • bench (or pastry) scraper
  • rolling pin
  • pastry brush
  • 9 or 9.5-inch [23-24 cm] fluted round tart pan with removable bottom, about 1 inch [2.5 cm] high. (Note: If you don't have a tart pan with a removable bottom, don’t worry! You can make crostata using a 9-inch cake pan or even a 9-inch pie plate. See the Additional Information section for information on using different pans.
  • a food processor is useful, but not required

Pasta frolla

Ingredients:
  • 1/2 c. minus 1 tablespoon [105 ml, 100 g, 3 ½ oz] superfine sugar (see Note 1) or a scant 3/4 cup [180ml, 90g, 3 oz] of powdered sugar
  • 1 and 3/4 cup [420 ml, 235 g, 8 1/4 oz.] unbleached all-purpose flour
  • a pinch of salt
  • 1 stick [8 tablespoons / 4 oz. / 115 g] cold unsalted butter, cut into small pieces
  • grated zest of half a lemon (you could also use vanilla sugar as an option, see Note 2)
  • 1 large egg and 1 large egg yolk, lightly beaten in a small bowl
Note 1: Superfine sugar is often also referred to as ultrafine, baker’s sugar or caster sugar. It’s available in most supermarkets. If you cannot find “superfine” sugar, you can make your own by putting some regular granulated sugar in a food processor or blender and letting it run until the sugar is finely ground.
Note 2: There are different ways of making vanilla sugar. I keep vanilla beans in a jar half-filled with sugar until I need to use them, for example, to make vanilla ice cream. After I remove the split bean from the custard that will go into the ice cream maker, I rinse it, dry it and put it back in the jar with sugar.
Making pasta frolla by hand:
  1. Whisk together sugar, flour and salt in a bowl.
  2. Rub or cut the butter into the flour until the mixture has the consistency of coarse crumbs. You can do this in the bowl or on your work surface, using your fingertips or an implement of choice.
  3. Make a well in the center of the mounded flour and butter mixture and pour the beaten eggs into it (reserve about a teaspoon of the egg mixture for glazing purposes later on – place in the refrigerator, covered, until ready to use).
  4. Add the lemon zest to your flour/butter/egg mixture.
  5. Use a fork to incorporate the liquid into the solid ingredients, and then use your fingertips.
  6. Knead lightly just until the dough comes together into a ball.
  7. Shape the dough into a flat disk and wrap in plastic wrap. Place the dough in the refrigerator and chill for at least two hours. You can refrigerate the dough overnight.
   
Making pasta frolla with a food processor:
  1. Put sugar, flour, salt, and lemon zest in the food processor and pulse a few times to mix.
  2. Add butter and pulse a few times, until the mixture has the consistency of coarse meal.
  3. Empty food processor's bowl onto your work surface
  4. See step 3 above and continue as explained in the following steps (minus the lemon zest, which you have already added).
Variation for Version 1 of pasta frolla:
If you want, you can make the pasta frolla using a combination of all-purpose flour and whole-wheat pastry flour.
If you choose to try this variation, use 1 cup [240 ml, 135 g, 4 3/4 oz.] unbleached all-purpose flour and 3/4 cup [180 ml, 100 g, 3.5 oz.] whole-wheat pastry flour.

Raspberry-Cassis Pastry Cream Filling
Ingredients:
2 oz cornstarch
16 fl oz milk
4 oz sugar
1 egg
4 yolks
2 oz butter
1/2 cup frozen raspberries (thawed)
1/8 cup cassis liqueur

  1. Put sugar and 7/8ths of the milk in a pot and boil till the sugar dissolves.
  2. Meanwhile, whisk cornstarch and remaining cold milk together (note, cornstarch only dissolves in cold liquids, not in hot.)


 3. Whisk the eggs and yolks together with the cornstarch mixture. Also mix together the raspberries and cassis liqueur, roughly breaking up the raspberries.

 4. When the milk and sugar are boiling, pour into the egg- cornstarch mixture and whisk constantly. Bring entire mixture back to the pot over heat. Always stir, never stop stirring!
5. Add the raspberry mixture to it, and if you want a darker color, add some gel food coloring at this time to make the color more intense.

 6. Allow the mixture to thicken and come to a boil (it will bubble lightly) but stir constantly!

 7. Pour the cream into another bowl and add the cut up butter, whisking till it incorporates.
8. Cover with plastic wrap and allow to cool. (put little wholes or cuts in the plastic wrap to allow steam to escape.)


Rolling out the Dough
Using a rolling pin roll out the dough very thinly and put over the tart pan, trimming the edges.


Then you must perforate it with a fork so that when the dough is in the oven it doesn't pop up.  You can either blind bake the pasta frolla first and then put in the filling or bake it with the filling already inside. I chose the latter.

 After putting in the filling and leveling it off, you can put a top crust also or leave it open. I used cookie cutters to decorate my top crust. I rolled it out on top of the filled tart and pressed the edges together.

 Before they go in the oven you have the option to give them an egg wash or to leave them plain. I left them plain because I wanted to glaze them with strawberry preserves when they came out of the oven.

Bake at 350 F for about 20 minutes or until the pastry is cooked (it all depends on the thickness of the pastry.)

 When they come out, glaze them with preserves of your choice (if you didn't already egg wash) and allow to cool before slicing and eating. The pastry cream will be very very hot!

And below is a cross section of my beautiful individual crostatas.
I served these with my brandied cherry choc-chip ice cream from a previous post. It was a divine marriage of flavors and textures. Try it!!


Friday, November 26, 2010

Thanksgiving turkey with everything goes sauce

I am one of those people whose least favorite food item during Thanksgiving has always been the turkey. I detested chicken as a child and turkey was just more dry and bland meat. That is until this year! My  daring task this year was to cook my very first turkey. It seemed intimidating at first but it was actually quite easy.. you just need to know a few tricks. So after this year's thanksgiving I can no longer say that I don't like turkey.. I just have to be the one to cook it!
I picked a 10lb bird since we didn't have any family over for thanksgiving. It was gone in 2 days... not that it was a small bird.. it was just so delicious. It's a bit late but I will teach you my tricks for a super moist and tasty turkey.

4 days before
Start defrosting the bird by putting it in the fridge instead of freezer.

3 days before
Make a compound butter by melting a stick of salted butter and mixing it with the spices of your choice. I chose rosemary and thyme. I also added truffle oil, truffle pieces, salt, pepper. You want this butter to be as tasty as possible. Store in the refrigerator.

2 days before
  1. Hopefully the turkey will have thawed at this point. If not, immerse it in room temperature water for 30 minutes or until it's completely thawed.
  2. Take out the interior organs of the bird (save the neck).
  3. Get your hands (gently) between the skin and the muscle so as to make room. Almost like an envelope. You are going to put the compound butter (at room temperature) into this pocket you have created. Try not to tear the skin when doing this. Also try to open up the skin between the leg. You won't get all the way around the bird's breast and legs but you can try your best without ripping the skin.
  4. Once the butter is all rubbed inside the pocked you have created.
  5. cover the bird with a brining bag and store in the fridge until the big day.
You must be wondering what all this butter is for? It will keep your bird moist and give it a lot of flavor since the butter has been seasoned and rested for a day. Otherwise your bird wouldn't have any flavor below the skin.

day of
  1. Put the turkey on a roasting pan (cover the bottom of the pan with aluminium foil for easy clean up -it will get messy.) Place sprigs of fresh herbs inside the cavity (I used thyme, rosemary, and cooked brown rice with raisins and almonds)
  2. Tie the bird together for even cooking
  3. Place in the oven at 250-300 F and set your timer to 30 minutes.
  4. Meanwhile prepare a mixture of chicken stock and white wine (about 3 cups worth) and melt half a stick of butter. Have all these handy.
  5. Every 30 minutes you will brush the turkey with this liquid mixture and butter. This will keep your bird very moist and add more flavor. Don't forget to set the timer.. every 30 minutes for as long as the turkey takes to bake. If it's a large turkey you may need extra liquid and butter for brushing.
  6. Most turkeys have that small red dot that tells you when it's done, I don't trust them so I like to check my meat with a thermometer. It is likely that doing the turkey with this method I just described, the bird will cook quicker. Mine should have taken 5 hours and it took 3. So when you think the turkey looks done, poke it with a thermometer and it should read 180 degrees. Over-roasting will make the turkey dry out.

So then what about the gravy right?
Well.. to tell you the truth.. this turkey doesn't need gravy.. it has so much flavor.. but I did make a pan sauce to go with it that was quite delicious. My husband liked it so much he wanted to put it on everything.. even an empty spoon!

  1. With the neck you saved from the turkey you'll sautee that with a little butter and 1/4 chopped onions.
  2. Once the meat has browned and the onions have color, deglaze the pan with 1/2 cup milk.
  3. Add 1 tablespoon of milk, whisk a little, and take out the turkey neck (discard it). By adding 1/2 cup white wine and extra milk, you will make a bechamel sauce out of this mixture. 
  4. Season with salt, pepper and sage.
  5. As this mixture cools while you wait for the turkey, it will ticken, but right before serving the turkey, add another 1/4-1/2 cup liquid to the sauce to make it runny again.
  6. Whisk 1 minute and serve with your turkey!

I was proud of this big bird!

Turkey with tangy sweet mashed potatoes and the everything goes sauce!

The mashed potatoes were super healthified, I boiled them, then mashed them and added some yogurt (1/3 cup) and ricotta cheese (1/4 cup) to make them creamy. I seasoned them with salt, pepper and DONE! The easiest thing on the menu.

Thursday, November 25, 2010

a Little about me

Well, the good news is finally here.. as of yesterday I became the Norwood Club's Executive Pastry Chef. The Norwood club is a private club for artists on 241 W 14th Street between 8th and 7th aves, and I have the honor of creating their dessert menus. I am working on one to begin in December and hope that it will be a hit. I can't give out any secrets yet but I guarantee it will please your tastebuds.
So in honor of this achievement I'm posting some sweet celebratory photos taken by my favorite photographer Josh Wong. It was part of my engagement session but I thought they looked beautiful and it just goes to show how an artist's eye can make even paper flowers or twizzlers seem appealing!
This is the Amazing 'Black Forest Cake' with brandied cherries and whipped cream.


a sweet picnic


Wednesday, November 17, 2010

Ravioli in Vodka Sauce Healthified!!

Aaah what is better than a delicious ravioli in vodka sauce? Answer: One with just as good of a taste but with far less calories! That's right.. you can have your pasta and eat it too with this recipe.
It's bad enough that ravioli on it's own has a lot of calories from carbs and a lot of times fat found in cheese, but you don't need to add a heart clogging Vodka sauce to make it taste good. My husband loves ravioli in vodka sauce, so I found a ravioli filled with lobster instead of cheese and decided to make my own vodka sauce with the following recipe.

Vodka Sauce

  •  1 tablespoon butter
  • 1 tablespoon of flour
  • 1 cloves garlic, minced
  • 2 small shallots, minced  (or one large onion)
  • 1/2 cup white wine * (although the alcohol will be cooked off, I preferred using a lighter alcohol so as not to impart such a strong taste to the sauce)
  • 1/4 cup chicken stock
  • 1/2 cup tomato paste
  • Coarse salt and pepper
  • 3/4 cup non fat milk

Method

  1. Melt butter in a pan and cook flour  shallots/onions and garlic in it till onions slightly caramelize.
  2. Gradually add little amounts of milk to the flour mixture till it thickens. (You're making a bechamel here.) Do this with the remaining milk, then add the tomato paste, chicken stock, and wine gradually.
    Note: if you find that your sauce is too runny or not thickening anymore, stop adding liquids and/or add a little amount of flour to it until the right consistency is reached.
  3. Season with salt and pepper.
  4. Toss with your cooked Ravioli and enjoy! Guiltless!


Sunday, November 14, 2010

NYC Chocolate Show 2010


For those of you who didn't know, this weekend was the NYC Chocolate Show, an incredible event where chocolatiers come together to display their delicious goodies to the public, as well as demonstrations by famous pastry chefs on everything CHOCOLATE! It is a sweet event! Unfortunately  I always end up eating way too much chocolate for my own good. But it's a once a year event, and the demos are always incredible. Chefs like Jaques Torres, Johnny Iuzzini, Zac Young, Nick Malgieri and many others demo their desserts and then allow the public to taste them. (Recipes will soon be posted on the chocolate show website.) I can't express how much I love this event.
Here are some photos from the event.

With this show, there is always a fashion show to inaugurate opening night. All the costumes are made out of chocolate.


Then for those of you who are not familiar with the new foodscapes artist, Carl Warner, you should get familiar with him. His work is unelievable. He created this chocolate foodscape bellow the "Chocolate Express " (displayed at the chocolate show) and has many other images that are incredible.


Then there were all the displays of beautiful and delicious chocolates from many exhibitors..

For a little education on Chocolate and how it's made from bean to bar, see Le Bernardin's Executive Pastry Chef, Michael Laiskonis' blog on his adventure in a cacao plantation, complete with pictures!


The demos were a great part of the event. The first Demo I attended was Michelle Tampakis' (who was actually my pastry teacher!) and also one of the top 10 pastry chefs of 2010. She has celiac's so she has to make everything Gluten Free, including her entry for the top ten pastry chef event. For the chocolate show she created a Pumpkin Chocolate Swirl Cheese with a Gluten-Free Chocolate Base.


These are a few of the items at Jaques Torres' booth. Gift Boxes made out of Chocolate!

 And his bonbons... I love the lovebug one!

This next Dessert was from Chef Dean Anderson at One if By Land, Two if By Sea. It's a delicious Chocolate Bread almost like a Cinnamon Roll with nuts and a great chocolate molten center. And one little tid bit we found out about Chef Dean...he doesn't like eating Vanilla Ice Cream sinc ehe ate too much of it as a kid! Who would have known..


Chef Dean loves chocolate chip cookies!

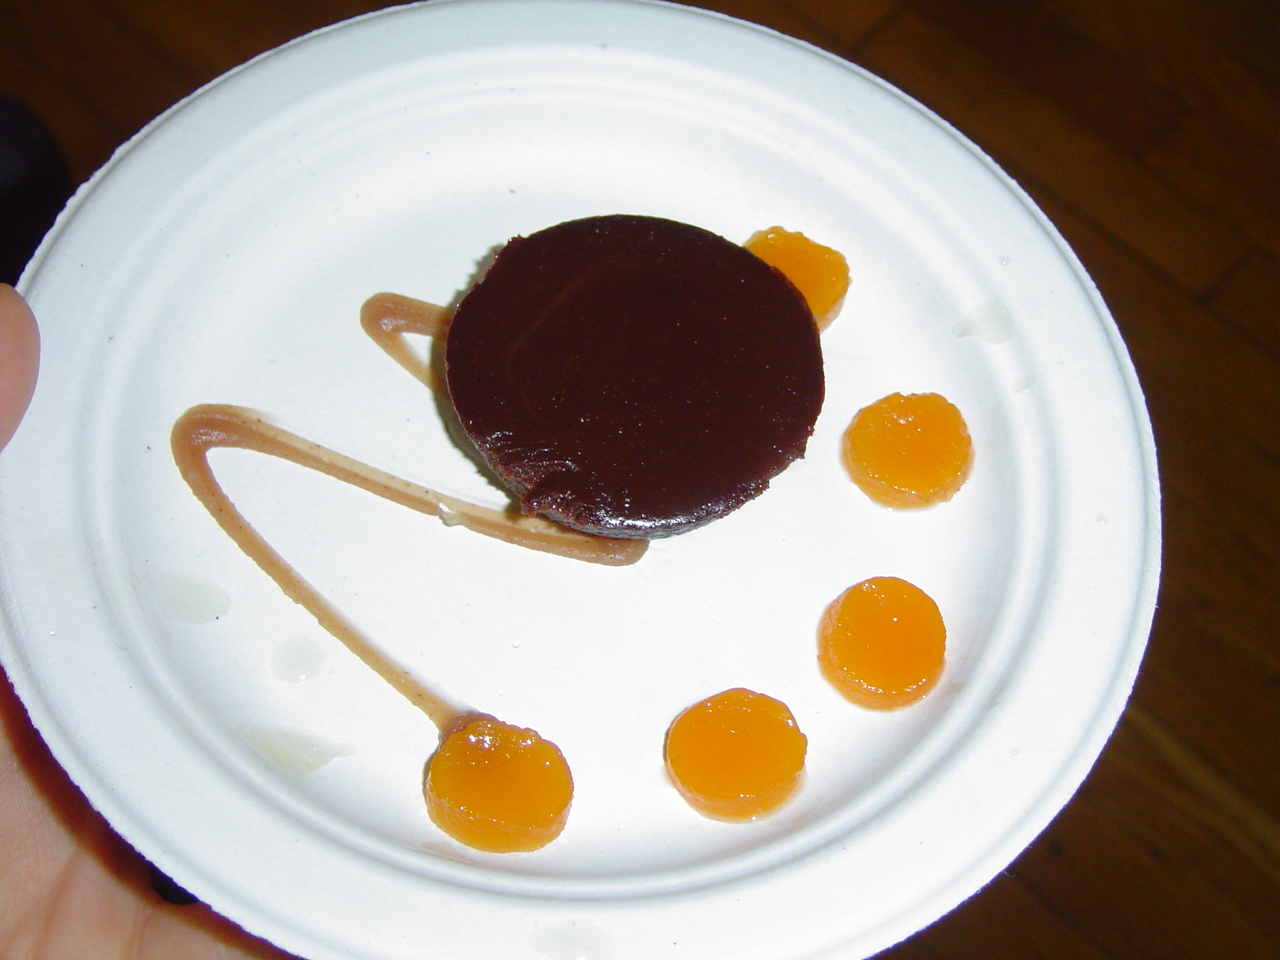
This is the dessert from Chef Joseph Gabriel at the Pluckemin Inn in NJ. It's a Chocolate Torte with a chestnut puree, and candied pumpkin. It was a very interesting flavor combination. Different most of all, which I love!!


Chef Joseph likes Valrhona!

This is a photo of the tea from one of the exhibitors at the show. It smelled sweet of herbs and fruity accents. They looked beautiful.


This next dessert is a chocolate Panna Cotta with fruits. Simple and delicious, the fruit really adds to the flavor profile.


And if any of you are fans of Top Chef's Just Desserts on Bravo.. here's a treat for you.. Zac Young, Executive Pastry Chef at  Flex Mussels in NYC. He made a "Chocolate Cream pie on-it's-side" complete with the disco dust!!


These little shot glasses were the tasting versions for the audience... the top layer with the creme fraiche whipped cream, chocolate cremeux in the middle, and Zac's own version of an oreo cookie crumb.
Zac displays his plated version.


Beautiful, complete with a dark caramel brushed onto the plate and a half sphere of chocolate made with nothing other than a balloon!


And everybody's favorite treat was Johnny Iuzzini, The Executive Pastry Chef at Jean Georges and also Top Chef Just Dessert's Judge. Johnny made a chocolate-sesame dessert which included a variety of different components.

Chocolate strings solidified in liquid nitrogen, chocolate brownie, white chocolate-sesame mousse and a chocolate curd.


Despite the celebrity chefs and their astronomical desserts, I think the best dessert out of the show was actually this next one, a chocolate bread pudding made by Gramercy Tavern's Executive Pastry Chef, Nancy Olson. It was moist and chocolaty and ooooh so good!


If you want to join the chocolate madness.. stay tuned for next year's Annual Chocolate Show!!