Showing posts with label Cookies. Show all posts

Thursday, April 7, 2011

C is for Cookie Monster!

I'd been wanting to make these for a while and when a client asked for them, I was thrilled! They are mini cupcakes, the size of a quarter.
I love the cookie monster cupcakes. So easy to do. All you need is a 233 Tip.
Wilton does a great job of tutoring non bakers on this. I use this tip for grass finishes and cookie monsters!
For the cookie monsters, just top his mouth with a chocolate chip cookie and dot some googly eyes and you are all set!
Get the kids to help you out on this one, they are going to love it!

Friday, February 11, 2011

Valentine Treats


I Love Valentine's Day.. Red Pink and White go so well together! And the shape of a heart is lovely too.
One of my favorite valentine treats are heart shaped linzer cookies.. I adore linzer cookies.. my favorite.. so turn them into a heart and that makes it all the better.

Here's my favorite recipe for
Linzer Cookies
110 grams hazelnuts
260 grams all purpose flour
1/2 teaspoon cinnamon
1/4 teaspoon salt
227 grams  butter, room temperature
135 grams granulated white sugar, divided
1 teaspoon pure vanilla extract
2 large  eggs

Confectioners' (Icing or Powdered) Sugar for dusting
Strawberry Jam, as needed

1. Place hazelnuts, flour, cinnamon, salt and a TBSP of the sugar in a food processor and grind till fine.
2. Cream butter and sugar till fluffy and creamy.
3. Add vanilla and eggs to the sugar-butter mixture.
4. Add the dry ingredients and mix till combined (don't overwork the dough, you want it crumbly)
5. Wrap up the dough in plastic wrap and press it together, shape into a flat rectangle.
6. Refrigerate dough for 1 hour. Preheat oven to 350F
7. Roll out dough onto lightly floured surface. Roll till about 1/4 inch thick and use cookie cutters to cut out desired shapes, using a smaller cookie cutter to cut an opening in the centre of the cookies for your 'red window'.
8. Refrigerate cut out dough on the cookie sheet for about 10 minutes.
9. Bake for 12 minutes or until golden in color. (Don't over bake, remember cookies harden as the cool so they should come out of the oven soft.)
10. When the cookies have cooled, top one non-centre-cut cookie with jam and press a cut-centre cookie over it.
11. Sprinkle with powdered sugar (don't worry about the sugar on the jammy window, it will be absorbed by the jam within 5 minutes and you'll have a perfect red window)
12. Give to your valentine and wait for the hugs and kisses to come!!

Happy Valentine's Weekend!

Tuesday, November 30, 2010

Emily Mori - Patisserie in Japan

Have you heard of Emily Mori? If you live in the USA most likely not, but if you live in Japan, you will soon be able to eat her delicious treats as her Patisserie will open up in the next couple of months. I had the pleasure of eating some of her handmade treats recently and they are d-e-l-i-c-i-o-u-s. Very unconventional for american ways. The box they came in was impeccable, not just any paper box, and the packaging was perfect..just like the japanese ways.
My favorite was the sesame cookie. Quite a destinct flavor. It had a delightful crunch to it.
Emily studied pastry in Japan and spent some time in France perfecting her art. Although she  already takes online orders, she has us quite excited about the opening of her shop.

The delicious sesame seed cookie!

Here is some of her work

Tuesday, November 2, 2010

French Macarons


It's taken me this long to re-try my macarons. I found out the first time I made them that when they say to wait 30 minutes before baking, that they mean WAIT 30 MINUTES!

So here is a little history on Macarons, not spelled with a double 'o'. Macaroons with two 'o's are the chewy clumps of coconut that are so delicious especially when dipped in chocolate.

The macaron is a cream-filled sandwich cookie from France.


The English word macaroon is derived from the French macaron, which in turn comes from the Italian maccherone, or "fine dough."
The macaron's origin isn't clear, but it may have been brought to France from Italy as early as 1533 by Catherine di Medici and her pastry chefs. Macarons gained fame in 1792 when two Carmelite nuns seeking asylum in Nancy during the French Revolution baked and sold macarons in order to support themselves, thus becoming known as "the macaron sisters." The macarons they made were a simple combination of ground almonds, egg whites, and sugar. No special flavors. No filling. Just 100% cookie.

It wasn't until the 1900s that Pierre Desfontaines of Parisian pastry shop and café Ladurée decided to take two cookies and fill them with ganache. Today Ladurée continues to be one of the first stops for macaron-crazed fans in Paris. No longer a humble almond cookie, the macaron turned into a versatilely flavored treat with a thin, light crust briefly giving way to a layer of moist almond meringue following by a center of silky smooth filling.

The innards of Pierre Hermé's limited edition ispahan macaron


Here is how a macaron should and shouldn't look like!
Here's what I look for in a macaron:
  • The cookie-to-filling ratio should be between 1:1 and 2:1. I have seen the atrocity that is a thin layer of filling spread upon one cookie, or a blob of filling that fails to extend to the edge of the cookie. Not cool, man, not cool. I feel like this is one of the easiest problems to "correct" when making a macaron; if the filling looks skimpy, just squeeze in a bit more. Just a bit! But no. We are frequently denied this extra squeezing.
  • The filling should be smooth, firm (like ganache), light, and not sticky. Aside from a few wayward crumbs, eating a macaron should be clean. Filling shouldn't squish out of the cookie nor should it leave much residue on your teeth. (This may not apply to all fillings, such as caramel or jams.)
  • The texture and surface of the cookie should be very smooth. Bumps show that the almond wasn't ground finely enough or wasn't sifted to take out the chunks. A chunky macaron might taste okay, but a finer one tastes better.
  • The crust of the cookie should be thin and only provide the most useless protection against the soft cookie layer underneath. Biting through the crust should be effortless. A dry, semi-hard crust that shatters into the soft center of the cookie is not fun.
  • The cookie's texture beneath the crust should be light, just a little chewy, and soft, but not so soft that it's mushy. It's okay if the cookie looks "uncooked."
  • As much as I love sugar, sweetness shouldn't take over in a macaron. They come in a wide variety of flavors for a reason—so you can taste the flavor. Cloying sweetness that forms a lump in the back of your throat is a no-no.

Here is the Basic Recipe. Feel free to add any flavorings you like.
250g Almond Flour
450g powdered sugar
200g egg whites (aged)
50g granulated sugar
2g cream of tartar (oprional)


1. Whip the egg whites with the cream of tartar and granulated sugar to stiff peaks. Do not beat on high speed or you will not get the correct egg structure.


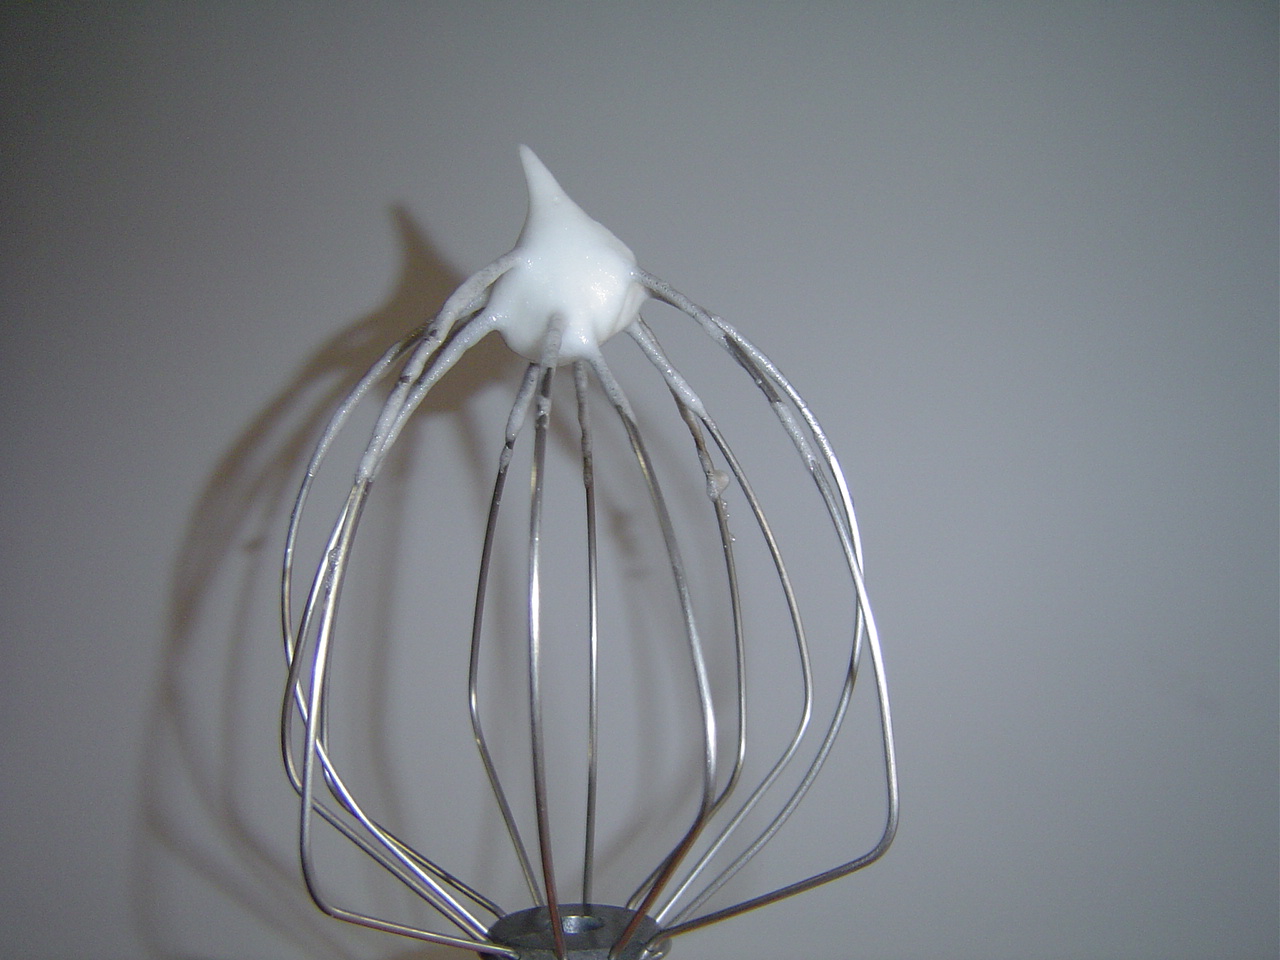
Stiff peaks should look like this: When you pick up the whisk, the peak stands up straight. 
2. Sift the remaining dry ingredients and fold them into the egg whites.

3. Using a piping bag and a medium tip, pipe small dollops onto a silpat or parchment paper. Let these stand for 30 minutes (yes.. wait the 30 minutes!)


4. Preheat the oven to 440F degrees and bake macarons in the back of the oven for 6 minutes (where it is hotter). Then move them to the front of the oven and pake until cooked through and center is no longer dry. They shouldn't get a lot of browning so don't look for that as your cue. The best way to do it is to touch them ever so gently on top and see if the crust is thick enough. The first batch might be a test batch but the next ones you should know better. I recommend a test batch for sure if you've never made them before.
Bon Appetit


Sunday, September 26, 2010

Peanut Butter Choc-Chip Cookies

It's that time of the year when we all want to start baking and staying at home instead of going out in the cold- ok maybe we are not there yet but we will be there soon!! And with halloween coming up, you might want to consider giving kids something other than sugar, so make them cookies instead. I do that every year since parents are more likely to allow their kids to eat a cookie (sugar in desguise) than a wad of sugar wrapped up in a pretty colorful wrapper called a dum dum!

So here is a PB Choc Cookie Recipe you might enjoy.  This is a large batch enough for about 15 monster sized cookies or 40 kid-size cookies.

Ingredients

420g butter
150g peanut butter
336g brown sugar
268g regular sugar
3 eggs
7 g salt
6 g baking soda
1.5 g baking powder
600 g flour
270g mix of white and/or dark chocolate chips or chunks


Directions

  1. Cream the butter and peanut butter for 4 minutes
  2. Add the sugars and cream for 6 minutes
  3. Add eggs and cream for 5 minutes
  4. Add all the dry ingredients just until incorporated
  5. Add the chocolate chips just until incorporated