Showing posts with label Cake. Show all posts

Tuesday, September 27, 2011

Candyland Wedding

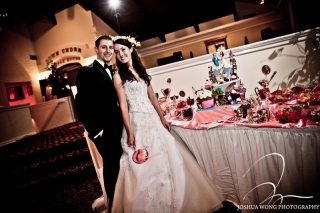
My Super Sweet Wedding was this past august, I had to share the details with you!

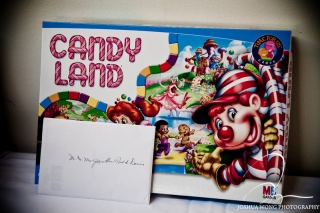
It took us forever to figure out what theme to do for our wedding. I needed a theme and I needed a really great and memorable party! I am obsessed with candy and sweets, and my husband loves the game candyland. I love the game just for the pure creativity of it! We figured it would be a really great theme!
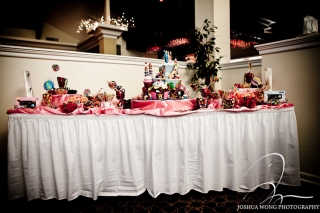
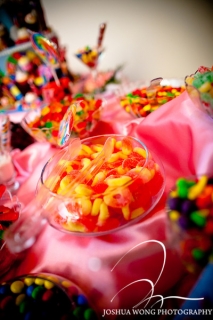
I knew I wanted a candy buffet, filled with colorful candies as well as our favorite candies.
Runts, gummy peach rings, sour patch kids, gummy worms, chocolate malt balls, M&Ms, skittles. We had it all! Purchasing candies at a wholesale store made a big difference in the budget. We purchased ours at Economy Candy. All 80lbs worth. We also purchased unicorn pops and swirly pops.
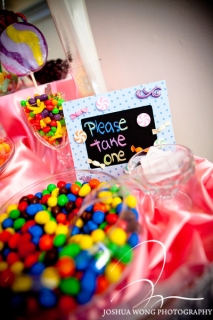
We had clear cellophane bags and seal stickers on the table so that guests could make their own favor bags. I made a little sign that said ‘Please take one’. I liked this idea because it allowed guests to select as much or as little as they wanted and select their favorite candies as opposed to being stuck with a candy assortment which they don’t like. I made the photo frames myself. I purchased some discounted frames at the craft store ‘Michaels’ and bought some chalkboard paper. I cut out the chalk board paper to fit the frame, added some cute candy-themed stickers and voila, a very cute homemade sign.
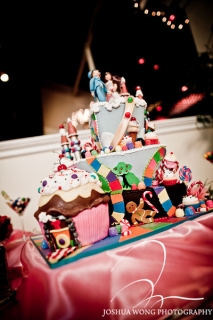
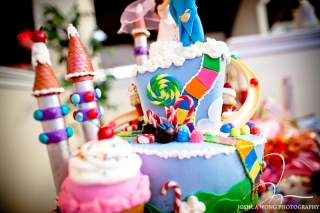
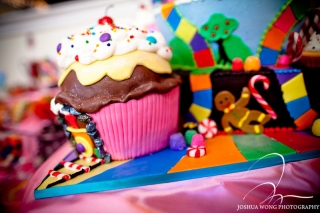
I needed the cake  to be spectacular and fitting with the theme so I asked one of the top cake artists in the United States, Kim Morrison, to create a cake based on the Candyland game. I gave her the board game and asked her to do whatever she liked. The result was the most spectacular cake I have ever seen.
The cake was colorful and had fantastic detail! And did I mention it tasted amazing?
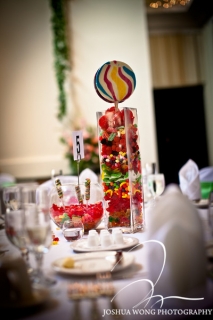
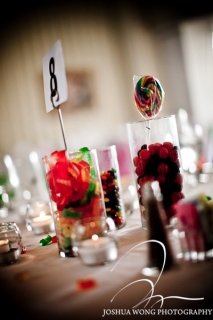
The table settings had to match the theme. Instead of flowers which become too costly we decided to use candy arrangements as the centerpieces. All the tables had different arrangements. This kept them unique and not cookie-cutter like.
The kids were especially happy to have so much candy at their tables, even the adults tried to stuff as much candy as they could in their suit jacket pockets and purses. With 80lbs of candy there is really no need to be shy! We estimated 1lb of candy per guest. Sure we had some left over but we didn’t mind it, as long as we didn’t run out!
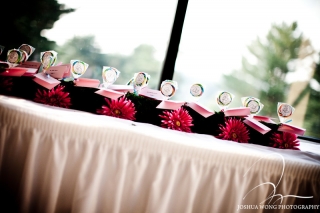
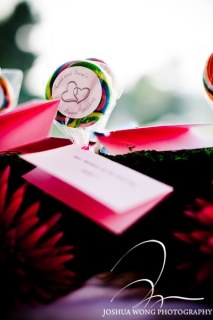
I wanted to stick to the candy for the name cards  so I bought many small swirl pops with a personalized wedding sticker on them from Oriental Trading, attached the name cards with pink and blue ribbons and stuck them onto a moss covered piece of Styrofoam. The Gerber Daisies which were my wedding flowers also added a floral touch to the moss. 
Making all of these items yourself really saves you a lot of money on a party. They require a lot of work but the end result is fabulous, just the way you want it, and very affordable.
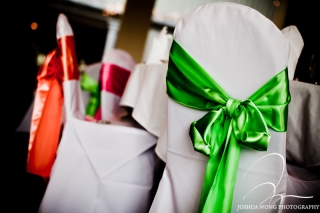
Colorful sashes on the chairs also added some fun activity in the room.  It turned the plain white chairs into very vivid and bright seats.
So there you have it- a great wedding party that you can transform into a birthday party, christening,  bachellorette party, any party were sweet color and fun are required!

Wednesday, July 27, 2011

July Daring Baker's Challenge: Fraisiers


Jana of Cherry Tea Cakes was our July Daring Bakers’ host and she challenges us to make Fresh Frasiers inspired by recipes written by Elisabeth M. Prueitt and Chad Robertson in the beautiful cookbook Tartine.

I decided to do a summery peach dessert. I just love peaches in the summer.

Basic Sponge Recipe
Ingredients:
1 cup + 2 tablespoons (270 ml) (5½ oz/155 gm) all-purpose flour
1 teaspoon (5 ml) (4 gm) baking powder
3/4 cups (180 ml) (6 oz /170 gm) sugar
1/2 teaspoon (2½ ml) (1½ gm) salt, preferably kosher
1/4 cup (2 fl oz/60 ml) vegetable oil
3 large egg yolks
⅓ cup + 1 tablespoon (3.17 fl oz/95 ml) water
1 teaspoon (5 ml) pure vanilla extract
3/4 teaspoon (3¾ ml) (3 gm) lemon zest, grated
5 large egg whites
¼ teaspoon (1¼ ml) (1 gm) cream of tartar

Directions:

Preheat the oven to moderate 325°F (160°C/gas mark 3).
Line the bottom of an 8-inch (20 cm) spring form pan with parchment paper. Do not grease the sides of the pan since the cake needs to adhere to the sides for lift.
In a large mixing bowl, stir together the flour and baking powder. Add in all but 3 tablespoons (45 ml.) of sugar, and all of the salt. Stir to combine.


In a small bowl combine the oil, egg yolks, water, vanilla and lemon zest. Whisk thoroughly.


Combine with the dry ingredients and mix thoroughly for about one minute, or until very smooth.
Put the egg whites into a stand mixer, and beat on medium speed using a whisk attachment on a medium speed, until frothy. Add cream of tartar and beat on a medium speed until the whites hold soft peaks. Slowly add the remaining sugar and beat on a medium-high speed until the whites hold firm and form shiny peaks.
Using a grease free rubber spatula, scoop about ⅓ of the whites into the yolk mixture and fold in gently. Gently fold in the remaining whites just until combined.


Pour the batter into the prepared pan. Bake for 45 to 55 minutes or until toothpick inserted into the center comes out clean.

Removed the cake from the oven and allow to cool in the pan on a wire rack.
To unmold, run a knife around the sides to loosen the cake from the pan and remove the spring form sides. Invert the cake and peel off the parchment paper. Refrigerate for up to four days.


Pastry Cream

Ingredients:
2 oz cornstarch
16 fl oz milk
4 oz sugar
1 egg
4 yolks
2 oz butter
1 Tablespoon Vanilla extract

 
  1. Put sugar and 7/8ths of the milk in a pot and boil till the sugar dissolves.
  2. Meanwhile, whisk cornstarch and remaining cold milk together (note, cornstarch only dissolves in cold liquids, not in hot.)


 3. Whisk the eggs and yolks together with the cornstarch mixture.


4. When the milk and sugar are boiling, pour into the egg- cornstarch mixture and whisk constantly. Bring entire mixture back to the pot over heat. Always stir, never stop stirring!

6. Allow the mixture to thicken and come to a boil (it will bubble lightly) but stir constantly!
7. Pour the cream into another bowl and add the cut up butter and vanilla, whisking till it incorporates.
8. Cover with plastic wrap and allow to cool. (put little wholes or cuts in the plastic wrap to allow steam to escape.)


Assembly

Split the sponge cake in half.  I moistened it with the canned peach syrup since it added more peachy flavor to the layer.


In a prepared ring mould with plastic wrap, place a layer of the sponge, then spread a thick layer of vanilla pastry cream over the cake.

I topped the cream with sliced peaches all over. I placed another layer of sponge cake, and topped it with pastry cream.


Top the pastry cream with another layer of moistened sponge and a small thin layer of pastry cream, then  knead some almond paste and roll it out to a flat disk over a powdered sugared surface. I placed it on top of the pastry cream directly.
At this time you would freeze your cake so that you can disassemble it and it holds it's shape. I was pressed for time so I used acetate on the outside so that I could unmould the cake right away. The presentation looks nice and you don't have to worry about spilling over.


I then decorated the top with peaches, some sanding sugar, and buttercream.


And voila!
Sunday, July 3, 2011

Underwater Barbie

Personality: Moist vanilla cake with silky vanilla frosting, coated with glittery fondant layers and embelishments. 


What's Baking?

Summer Birthdays are keeping us busy with many fun cakes, here are some of the latest.

Elegant Chocolate cake with chocolate mousse filling. Covered with fondant and adorned with gumpaste flowers.


Super fun vanilla cake with chocolate fudge filling. Topped with a fondant octopus and sugar silver pearls.

Monday, April 18, 2011

Tiki Cake


Name: Tiki Cake
Personality: Moist Yellow Vanilla cake with chocolate buttercream, fenced with hazelnut pirouette cookies.

Thomas the Tank Engine is More Popular


Name: Thomas the Tank for 70
Personality: Moist vanilla cake with silky vanilla frosting, coated with a shiny fondant layer. Bottom layer filled with vanilal pastry cream and fresh strawberries.
 

Sunday, April 10, 2011

Thomas the Tank Engine

You all know this little choo choo train! Here is a Birthday Cake I just made for a 5 year old!

Name: Thomas the Tank
Personality: Moist vanilla cake with silky vanilla frosting, coated with a shiny fondant layer.

Thursday, April 7, 2011

C is for Cookie Monster!

I'd been wanting to make these for a while and when a client asked for them, I was thrilled! They are mini cupcakes, the size of a quarter.
I love the cookie monster cupcakes. So easy to do. All you need is a 233 Tip.
Wilton does a great job of tutoring non bakers on this. I use this tip for grass finishes and cookie monsters!
For the cookie monsters, just top his mouth with a chocolate chip cookie and dot some googly eyes and you are all set!
Get the kids to help you out on this one, they are going to love it!

Sunday, March 27, 2011

Daring Baker's Challenge March: Meringue Filled Coffee Cake

 The March 2011 Daring Baker’s Challenge was hosted by Ria of Ria’s Collection and Jamie of Life’s a Feast. Ria and Jamie challenged The Daring Bakers to bake a yeasted Meringue Coffee Cake.

It was a fabulous challenge and I want to do it again VERY SOON! Tasty and must be eaten right away.. it's too good not to.

FILLED MERINGUE COFFEE CAKE
Makes 2 round coffee cakes, each approximately 10 inches in diameter
The recipe can easily be halved to make one round coffee cake

Dough Ingredients
For the yeast coffee cake dough:
4 cups (600 g / 1.5 lbs.) flour
¼ cup (55 g / 2 oz.) sugar
¾ teaspoon (5 g / ¼ oz.) salt
1 package (2 ¼ teaspoons / 7 g / less than an ounce) active dried yeast
¾ cup (180 ml / 6 fl. oz.) whole milk
¼ cup (60 ml / 2 fl. oz. water (doesn’t matter what temperature)
½ cup (135 g / 4.75 oz.) unsalted butter at room temperature
2 large eggs at room temperature

For the meringue:
3 large egg whites at room temperature
¼ teaspoon salt
½ teaspoon vanilla
½ cup (110 g / 4 oz.) sugar

Directions:
Hydrate the yeast with warm (not hot) milk and let it dissolve. Stir it a little.


Place all the dry ingredients together.

In a stand mixer, mix all the ingredients together with a dough hook. The dough should feel like bread dough and spring back when you poke it.

Allow the dough to rest covered until it doubles. This depends on how hot your kitchen is, it took me 2 hours.


When the dough has risen, prepare the meringue. Whip the whites with the salt, when they are soft peaks, gradually add sugar and vanilla till stiff peaks.

Roll out half of the dough into a rectangle.


Spread half the meringue over it.

Sprinkle some nuts, chocolate chips, cinnamon, sugar, and whatever else you like.

Roll up the dough.

Connect the ends and using a pair of scissors, make cuts around it.
Allow dough to rise another 45 minutes. Repeat same process with the other half of the dough. 
When dough has risen, egg wash it and bake at 350F for 35 minutes.


Allow it to cool.

Add whatever glaze you like, I did a chocolate frosting. I added some green sprinkles and some leafy greens as decor for St Patty's Day!


This product freezes well, I recommend freezing it without frosting if you don't eat it that day, then thaw it at room temperature when you are ready to eat it and frost it. If you have some left-over with frosting that you didn't freeze, it might start to go stale, as did mine. I ended up turning it into a bread pudding breakfast. It was amazing!