


I created an assortment of different types of chocolate candies. Truffles, bon bons, and molded chocolates.

My kitten also loved this challenge.. she always gets first dibs (just joking, I am a responsible pet owner and know that you don't feed chocolate to your pets!)
What is tempering?
“Tempering is a method of heating and cooling chocolate in order to use it for coating or dipping.
Proper tempering gives chocolate a smooth and glossy finish. Tempered chocolate will have a crisp snap and won't melt on your fingers as easily as improperly tempered chocolate.
Properly tempered chocolate is also great for molding candies because the candies will release out of the molds more easily and still retain a glossy finish.” - Ghirardelli
Why is it necessary?
If you simply melt chocolate and let it cool it will set with unattractive grey streaks or spots, called blooming. If eaten, the texture will be grainy and it won’t melt smoothly in the mouth.
When you temper chocolate the end result is shiny, even colored, smooth melting and with a crisp snap. Basically, tempered chocolate is what you want because it’s better in every way.The reason for the difference is a bit complicated, it has to do with different types of crystals forming in the cocoa butter at different times, to understand it fully you’d have to learn about the behavior of the chocolate crystals at a molecular level.
For our purposes all that we need to know is that with tempered chocolate the crystals have formed in a uniform way which gives us great looking and tasting chocolate.
What is couverture chocolate?
“Couverture chocolate is a very high quality chocolate that contains extra cocoa butter (32-39%). The higher percentage of cocoa butter, combined with proper tempering, gives the chocolate more sheen, firmer "snap" when broken, and a creamy mellow flavor.
The total "percentage" cited on many brands of chocolate is based on some combination of cocoa butter in relation to cocoa solids (cacao). In order to be properly labeled as "couverture", the percentage of cocoa butter must be between 32% and 39%, and the total percentage of the combined cocoa butter plus cocoa solids must be at least 54%. Sugar makes up the remainder, and up to 1% may be made up of vanilla, and sometimes soy lecithin.Couverture is used by professionals for dipping, coating, molding and garnishing.
The term "couverture chocolate" should not be confused with "confectionery chocolate", "compound chocolate" or "summer coating": these products have a lower percentage of solids, and they may also contain vegetable oil, hydrogenated fats ("trans fats"), coconut and/or palm oil, and sometimes artificial chocolate flavoring.
Some brands of couverture chocolate are packaged tempered, and others are packaged un-tempered. Subsequent tempering may or may not be required, depending on the usage and the desired characteristics of the final product.” - Wikipedia
Why is it important to use couverture for chocolate making?
It is by far a superior product to the average chocolate bar like Cadbury’s etc. which may also contain ingredients like vegetable/coconut/palm oil, hydrogenated fats and sometimes artificial chocolate flavoring which can have unpredictable results when tempering and used to make your own chocolates.
As far as flavor, couverture chocolate is also superior in this regard as manufacturers like Valrhona, Callebaut etc. are very strict with sourcing their cocoa pods and only buy the best.Make sure that if you’re using chocolate chips or callets that they are also couverture and specifically meant for chocolate making. For the above reasons as well as that normal chocolate chips have other additives in them that help them maintain their shape in baked goods like cookies. These additives stop the chocolate from tempering properly. If you’re not sure, rather buy your couverture in bars or slabs.
Basically, to get a great end result you need to use the best ingredients that you can get. That applies to all baking and cooking, and especially to chocolate making.
If you can’t get couverture or a higher end chocolate and would simply prefer to get your chocolate at the local market, choose brands like Lindt, Ghiradelli or Green & Blacks. Just remember, don’t get ordinary chocolate chips, they have additives in them that will hinder the tempering process. One thing, Ghiradelli does not liquefy as much as couverture chocolate when in temper, so you’ll have to do a lot of tapping off to get a thin, even coating.
There are other methods of tempering that don’t require a thermometer and can either be melted in a double boiler or in the microwave (we’ve included links at the end for some of these other methods), but we’ve provided you with two methods of tempering that use a thermometer for very accurate tempering.
Tempering
There are many different tempering methods, the easiest is in bowl seeding but if you have a marble slab in your kitchen like I do, that's my favorite way. It's the fastest and you really get to 'play' with your chocolate! Tempering is critical for some of the recipes featured below.
Method 1: On marble or granite
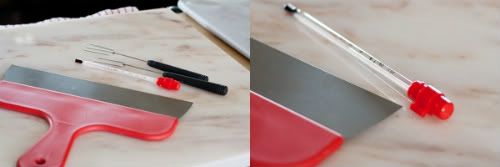
Marble slab, chocolate or bench scraper, dipping forks and chocolate thermometer
Tempering Ranges:Celcius
Dark: 45°C-50°C > 27°C > 32°C
Milk: 45°C > 27°C > 30°C
White: 45°C > 27°C > 29°C
Fahrenheit Dark: 115°F-120°F > 80.6°F > 87.6°F (note.. NEVER allow your chocolate to go over 120, if it does you have to discard it and start over with a fresh batch of chocolate. But don't throw away the chocolate, you can use it for baking at this point)
Milk: 115°F > 80.6°F > 86°F
White: 113°F > 80.6°F > 84.2°F
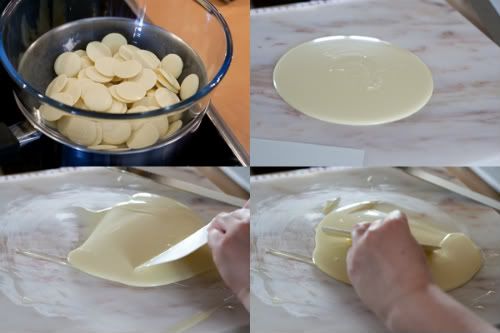
Chocolate is melted and heated until it reaches 45°C / 115°F. It is then poured onto a marble surface and moved around the surface with a scraper until it has thickened and cools to 27°C / 80.6°F. Once cooled it is then put back into the bowl and over heat to bring it back up to 32°C/30°C/29°C /// 87.6°F/86°F/84.2°F depending on the chocolate you’re tempering. It is now ready for using in molds, dipping and coating.
Tempering using a marble surface
• Finely chop chocolate if in bar/slab form. • Place chocolate in a heatproof bowl.
• Place bowl over a saucepan of simmering water (make sure the bowl does not touch the water).
Tip: Make sure that your bowl fits snuggly into the saucepan so that there’s no chance of steam forming droplets that
may fall into your chocolate. If water gets into your chocolate it will seize!
• Using a rubber spatula, gently stir the chocolate so that it melts evenly
• Once it’s melted, keep an eye on the thermometer, as soon as it reaches 45°C / 113°F remove from heat (between 45°C-50°C / 113°F-122°F for dark chocolate)
• Pour ¾ of the melted chocolate onto a marble or granite slab or worktop
• Using a scraper or large palette knife move the chocolate around the surface to help it cool
Tip: Keep the motions neat and tidy, if you’re not working with a lot of chocolate you don’t want to spread it too far otherwise you may end up with chocolate that begins to cool too quickly and start to set as well as drops below
• the necessary temperature. Use a motion that folds the chocolate on itself
• Check temperature regularly with a thermometer
• Once it reaches 27°C / 80°F put the chocolate back into the heatproof bowl with the remaining chocolate
• Gently stir together with a rubber spatula
• Check the temperature to see if it’s risen back up to the working temperature of the chocolate (milk, dark or white) as seen in the above chart
• If the temperature has not risen to its working temperature, put the bowl back over the simmering water, stirring gently
• IMPORTANT: You really need to keep an eye on the temperature as it can rise quicker than you think, so as soon as it’s up to its working temperature, remove from heat
• It’s now tempered and ready to use
Tip: If you’re using the chocolate to dip a lot of truffles etc. which means the chocolate will be sitting off heat for a while it will naturally start to thicken as it cools. To keep it at an ideal viscosity for even coating, put the bowl over steam for 30sec-1min every 5-10mins, just do not let the temperature go over the working temperature!
Tip: Having the chocolate in a warmed glass bowl and wrapped in hot kitchen towel can also help keep the chocolate at its working temperature for longer
Tip: It is also easier to keep the heat if you work with larger amounts of chocolate rather than small amounts. Any leftover chocolate can be kept to be used later and then re-tempered
Tip: Remember, don’t let any water get into your chocolate at any stage of the tempering process!
Method 2: With tempered chocolate pieces, also called “seeding”
Tempering Ranges:Celsius
Dark: 45°C-50°C > 27°C > 32°C
Milk: 45°C > 27°C > 30°C
White: 45°C > 27°C > 29°C
Fahrenheit Dark: 115°F-120°F > 80.6°F > 87.6°F (note.. NEVER allow your chocolate to go over 120, if it does you have to discard it and start over with a fresh batch of chocolate. But don't throw away the chocolate, you can use it for baking at this point)
Milk: 115°F > 80.6°F > 86°F
White: 113°F > 80.6°F > 84.2°F
Chocolate is melted and heated until it reaches 45°C / 115°F. Tempered un-melted chocolate is then stirred and melted in until it brings the temperature down to 27°C/80.6°F. It is then put back over heat and brought up to its working temperature of 32°C/30°C/29°C /// 87.6°F/86°F/84.2°F depending on the chocolate you’re using. It is now ready for using in molds, dipping and coating.
Tempering using the seeding method with couverture callets
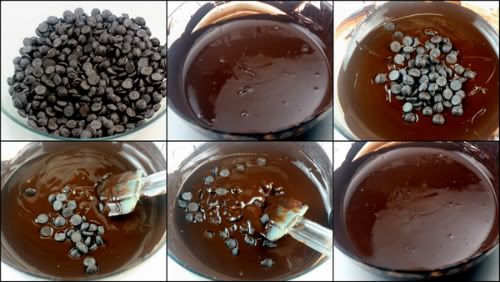
• Finely chop chocolate if in bar/slab form (about the size of almonds). • Place about ⅔ of the chocolate in a heatproof bowl
• Set aside ⅓ of the chocolate pieces
• Place bowl over a saucepan of simmering water (make sure the bowl does not touch the water)
Tip: Make sure that your bowl fits snuggly into the saucepan so that there’s no chance of steam forming droplets that may fall into your chocolate. If water gets into your chocolate it will seize!
• Using a rubber spatula, gently stir the chocolate so that it melts evenly
• Once it’s melted, keep an eye on the thermometer, as soon as it reaches 45°C / 113°F remove from heat (between 45°C-50°C / 113°F-122°F for dark chocolate)
• Add small amounts of the remaining ⅓ un-melted chocolate (seeds) and stir in to melt
• Continue to add small additions of chocolate until you’ve brought the chocolate down to 27°C/80.6°F (You can bring the dark chocolate down to between 80°F and 82°F)
• Put it back on the double boiler and bring the temperature back up until it reaches its working temperature of the chocolate (milk, dark or white) as seen in the above chart. (32°C/89.6°F for dark, 30°C/86°F for milk and 29°C/84.2°F for white)
• If you still have a few un-melted bits of chocolate, put the bowl back over the simmering water, stirring gently and watching the thermometer constantly.
• IMPORTANT: You really need to keep an eye on the temperature so that it doesn’t go over its working temperature
It’s now tempered and ready to useTip: Another way of adding the "seed" is by dropping in one large chunk of tempered chocolate (the seed). That way you only need to fish out one piece of unmelted chocolate and don't need to fish out several small bits of unmelted chocolate once the chocolate has reached temper.

Ingredients:
4oz Cream
4oz milk
2 oz light corn syrup
12 oz semisweet chocolate (64%)
4oz milk chocolate (38%)
1oz very soft butter
2oz cognac, grand marnier or any other alcohol
dark chocolate for enrobing
cocoa powder, coconut shreds, shredded almonds or any other desired topping for enrobing truffles
Method:
1. Bring cream, milk and light corn syrup to a boil (this breaks homogenization and allows ingredients to re-combine) then cool to 90F.
2. Melt chocolates together and cool to 90F
3. In a food processor steadily pour the warm liquid into the combined chocolates; then add in butter and liquor, very slowly since this can break the ganache.
4. Process smooth for 30 seconds.
5. Pour out ganache onto a tray lined with saran wrap. Cool to 75F
6. Pipe out small dollops of ganache with a large round tip. Chill dollops in the fridge until set.
7. Roll dollops of ganache between hands to form perfect spheres then chill again.
8. Using a chocolate dipping fork or regular fork, dip chilled chocolate spheres in melted chocolate, tap excess then immediately roll in cocoa powder or desired coating.
9. Allow chocolate to set around truffles before pulling them out of the cocoa powder and shaking off excess.
10. Now you are ready to try your first truffle!
Note: Play around with the recipe and change the liquor, or add some powdered ginger!
Earl Grey Truffles
I love tea so these ones are one of my favorite truffles!
Ingredients:
6oz water
1 oz lose earl grey tea (or any other tea)
3oz cream
3oz milk
1 oz light corn syrup
12 oz semisweet chocolate (64%)
4oz milk chocolate (38%)
1oz very soft butter
1oz orange liqueur
dark chocolate for enrobing
ground almonds or any other desired topping for enrobing truffles
Method:
1. Bring the water to a boil, off heat add the tea leaves and let steep for 5 minutes, no longer.
2. Strain liquid and weigh out 3oz of tea.
3. Bring cream, milk and light corn syrup to a boil (this breaks homogenization and allows ingredients to re-combine) then cool to 90F.
4. Melt chocolates together and cool to 90F
5. In a food processor steadily pour the warm tea and the creamy liquid into the combined chocolates; then add in butter and liquor, very slowly since this can break the ganache.
6. Process smooth for 30 seconds.
7. Pour out ganache onto a tray lined with saran wrap. Cool to 75F
8. Pipe out small dollops of ganache with a large round tip. Chill dollops in the fridge until set.
9. Roll dollops of ganache between hands to form perfect spheres then chill again.
10. Using a chocolate dipping fork or regular fork, dip chilled chocolate spheres in melted chocolate, tap excess then immediately roll in ground almonds or desired coating.
11. Allow chocolate to set around truffles before pulling them out of the almonds and shaking off excess.
12. Bon Appetit!

Cocoa Almonds
Ingredients:
400g whole almonds
130g granulated sugar
45g water
1/2 vanilla bean
120g tempered semisweet chocolate
cocoa powder or confectioner's sugar for dusting
Method:
- Toast almonds at 300F to warm slightly
- Cook the sugar, water and vanilla to 240F
- Add almonds to the sugar and continue to cook, stirring constantly. The sugar will begin to crystallize as soon as the almonds go in, so you must stir vigorously.
- Pour almonds onto parchment paper and allow them to cool.
- Once cooled, separate the almonds.
- Pour almonds into the tempered chocolate. Stir so they are all well coated.
- Drop the almonds into sifted cocoa powder or confectioner's sugar and coat.
- Place almonds in a large flour sifter so that excess cocoa powder falls off.
- Enjoy!
Ingredients:
4oz cream
4oz milk
2oz light corn syrup
zest of 3 lemons
8oz semisweet chocolate (64%)
8oz milk chocolate (38%)
1oz very soft butter
1oz white rum
1 tsp Boyajian lemon oil (no more than 1 tsp, this is very very strong)
Tempered dark chocolate for enrobing
Method:
1. Bring cream, milk and light corn syrup to a boil (this breaks homogenization and allows ingredients to re-combine)
2. Add lemon zest and allow to steep 10 minutes. Remove zest from liquid and then cool to 90F.
3. Melt chocolates together and cool to 90F
4. In a food processor steadily pour the warm liquid into the combined chocolates; then add in butter, liquor, and lemon oil very slowly since this can break the ganache.
5. Process smooth for 30 seconds.
6. Pour out ganache onto a tall rimmed tray lined with saran wrap. Chill till firm.
7. Unmold onto parchment, cut 1 inch squares then enrobe in tempered chocolate.
8. Allow excess to drip off and place on parchment paper to set.
9. At this point you can garnish the top with a candied lemon rind, or place a gold leaf on top, or even press a 1 inch square of chocolate transfer paper over the chocolate and allow it to set like that.
10. Once the chocolate has cooled and set, carefully remove the transfer paper and you have a beautiful design on top of your chocolate!
If you have a chocolate bonbon mold then you should give this one a try.
- Start off with very clean and dry molds.
- Drop some tempered chocolate into the molds until all crevices are entirely coated.
- Tap out excess and allow chocolate to cool (don't put it in the fridge or it might mess up your temper)
- Fill the molds with your desired filling, ganache, marzipan, peanut butter, etc. Leave a little room on top for the last layer of chocolate.
- Fill the remaining of the cavities with the tempered chocolate and scrape off excess chocolate from mold.
- Allow to cool
- Once the chocolate has cooled, it contracts so if your mold is clear, you will see the chocolate pull away from the cavity. When you turn it around the chocolate should drop straight out. If a few remain, tap the chocolate mold on a table a few times.


Once you've mastered the art of chocolate tempering, making bark is the simplest way to keep practicing that technique. Just temper some chocolate, pour it into a plastic lined tray, throw some chopped up nuts and dried fruits on top, and allow to cool. This is also a great way to use up extra tempered chocolate.


